Week 32 Homework 💻 🐭
New stuff we learned this week: 🤔
Unix Wizardry
- typing
<Ctrl+r>activates a search mode into your history of shell commands. Press it then start typing a semi-unique word or combination of letters to instantly find a command you’ve recently run. Type<Enter>to run the command you see appear, or<Ctrl+c>to cancel - typing
^<find>^<replace>will re-run the most recent shell command substituting<find>for<replace>, like so:
$ cat /this/is/a/really/long/path/i/dont/want/to/retype.js
> # some output from `cat`
$ ^cat^vim
$ vim /this/is/a/really/long/path/i/dont/want/to/retype.js
# the line above runs automatically, because of `^cat^vim`
VSCode
- VSCode is a free text-editor/lightweight IDE made by Microsoft. It’s become so good that almost everyone uses it now who develops in the web world, and in many other worlds as well.
- just because VSCode allows you to use your mouse, doesn’t mean you should do so! Treat it like vim. Every time you use your mouse, you should feel a small wave of shame and sadness.
- once you pull down my VSCode settings, you’ll have a bunch of nice extensions
installed, and a bunch of good keyboard shortcuts (many of which are
vim-inspired). Definitely focus on learning the main keyboard shortcuts:
- NOTE in the examples below, I’m putting
Cmdas short for Mac’s Command key, but if you’re on Windows or Linux, you would use the Alt key instead, so think ofCmdas meaning “Command or Alt” - NOTE #2 - but, if I say that the shortcut is
Ctrl— that means the shortcut uses the Control key on Mac, Windows and Linux. <Cmd+Shift+P>- open up the Command Pallete, in which you can start typing to see lots of wild stuff vscode can do for you<Cmd+t>opens up the Fuzzy finder — it allows you to quickly switch between files.- once you have the Fuzzy finder open and activated,
<Ctrl+j>and<Ctrl+k>(like vim!) move your selection up and down. <Cmd+b>toggles the visibility of the main sidebar<Ctrl+s>toggles the visibility of the “activity bar”<Ctrl+BACKTICK>toggles and focuses the integrated terminal (BACKTICK is `)<Cmd+j>toggles the whole bottom pane- pressing
<Cmd+/>will comment out whatever line or lines you have selected
- NOTE in the examples below, I’m putting
- When you’re editing a file, all your
vimcommands will just work. (Well, almost everything). - Vscode has the ability to let us edit code through ssh, so that we’re running vscode on our computer, but we’re actually working on a different computer that we have made an ssh connection to. We’re going to use the feature heavily, because we’ll still be doing our development on the HTC virtual machine, but we’ll have all the goodies that vscode gives us.
- vscode comes with a sweet binary executable file which we can use from our
terminal to type
code .orcode ~/some/pathand vscode will open up that folder for you to work in.
Useful Links:
Homework Plan:
- 1 day flashcard assignment
- 2 day touch typing practice
- 1 day VSCode homework
- 2 days web homework
- 2 days watch CCCS #29
Homework day 1
Homework day 2
Homework day 3
Flashcard Assignment
- add 2 new
unixflashcards:<Ctrl-r>^<find>^<replace>
- add 7 new flashcards in a new category called
vscode. IMPORTANT make sure you write down the correct key for your computer: if you’re not on a Mac, changeCmdto beCtrl.<Cmd+Shift+P><Cmd+t><Cmd+b><Ctrl+s><Ctrl+BACKTICK><Cmd+j><Cmd+/>
VSCode Homework
- open up a new terminal window (outside of VSCode, not using the built-in
terminal) and type
which code— you should see a path to thecodeexecutable file. If you get no response, Slack me. - still from terminal, create a new directory on your computer called
open-vscode, thencdinto it and usevimto create a new file calledtest.txtthat has a few words in it. - exit out of vim and type
code .— this command is like saying “Hey, vscode, open the folder that I’m in as a workspace”. Vscode should open up. - practice using the keyboard shortcut to toggle the activity bar. (It’s the narrow strip of icons on the far left.) After you’ve toggled it a few times, leave it visible.
- put your mouse over each icon in the activity bar and leave it still for a few seconds, you’ll see that vscode gives you some additional information.
- next, right-click on the source-control icon and click to “hide” it. We won’t be using vscode’s git integration, so we’ll just get rid of that icon. Do the same for the “Docker” icon.
- practice using the keyboard shortcut to toggle the whole sidebar.
- make sure that the
Exploreris chosen from the activity-bar and that you can see the sidebar, then see if you can figure out how to create a new file from the explorer sidebar, name itfoobar.txt. - next, try to create a new folder
- create a new file called
hello.jsinside the folder you created above. - now, use the keyboard shortcut to bring up the fuzzy finder and type a few
letters to narrow the search down to the
test.txtfile you created in step 6. Press enter to edit it. - while you’re editing the
test.txtfile, do all of thesevimtasks, and watch the color and text of the bar at the very bottom of vscode change:- insert some text and return to normal mode
- search for a word using
/<word> - go into visual mode, then come out
- go into visual-line mode, then come out
- go into visual-block mode, then come out
- type the keyboard shorcut which toggles and focuses the integrated terminal
- with the integrated terminal open, practice re-sizing the size of the bottom area by grabbing the line between the two sections and dragging it.
- in the integrated terminal, try out some normal commands like
ls,pwd, andecho - for fun, open up vim inside the integrated terminal, and edit the
test.txtfile:vim test.txt— make a few changes and then save. You should also see your changes in the vscode editor pane. - toggle the visibility of the bottom “panel” with
<Cmd+j>. This keyboard shortcut is slightly different from<Ctrl+BACKTICK>— because it just toggles the visibility of the whole bottom panel, instead of also selecting and focusing on the terminal. - with the bottom panel hidden again, use the shortcut for the Fuzzy finder to
open up the
hello.jsfile inside the dir you created in step 13. - edit the
hello.jsfile and add// @ts-checkat the very top of the file, on the first line. This means “hey typescript, even though I’m just writing javascript not typescript, go ahead and help me out!” - type this line of javascript:
let animal = "dog"; - now move your cursor somewhere over the variable name
animaland pressgthenhquickly (in vim normal mode). This commandghcauses vscode to pop-up informational goodies about whatever is under the cursor. - read this whole step before trying it: on a new line in the
hello.jsfile, you’re going to typeanimal.triand stop right there, after typing thetri. You should see that vscode is trying to help you. It knows thatanimalis a string, so it is suggesting methods you can call on a string. You should seetrim,trimRight,trimLeft, and maybe some more. Use your arrow keys to cycle through the available options, and look closely — vscode gives you inline documentation telling you about the functions, how they work, and what they return. See if you can understand what the different methods do. Then, pick one by pressing enter. - now, if it’s not already open, click on the
test.txtfile from the explorer sidebar. You should now have two tabs (technically called editors) open. You can arrange these side by side (like vim’s:vsplit) by grabbing one of the tabs and pulling it about 90% of the way over to the side of the window. Do this now. - try rearranging it to be on the bottom by dragging it there instead.
- next, we’re going to connect to our HTC virtual machine. To do that, use the
keyboard shortcut to bring up the Command Pallette. Start typing “remote”
and choose the option that says
Remote-SSH: Connect to host. It should read your~/.ssh/configfile and offer you the option ofhowtocomputer.link— select that one, and wait a few seconds while the remote development session is established. - once you’re connected, in the sidebar on the left it will say
No folder openedand display a big blue button toOpen Folder. Click the open folder button. - in the popup that appears, navigate to the
~/www/week-31/week-31-carsdir you were using last week. - make a few changes to one of your files from inside vscode
- then, open up your terminal app (or putty) and ssh in to the HTC machine.
Navigate into the same directory and use
git diffto verify that you were indeed making changes remotely using vscode. Wizardry! - spend a few minutes exploring around vscode and trying to figure out cool stuff. Find one thing you think is neat or helpful, and slack the #homework channel to tell us what it is.
Web Homework
- make sure you’ve done the vscode homework FIRST
- go to this page and work through all of the exercizes for a review of Flexbox. You’re going to need it.
- go to this GitLab URL, it’s a bare-bones repo I created to get you started with this assignment: https://gitlab.howtocomputer.link/htc/week-32-virtuoso
- fork this repo
- copy the ssh clone url from your fork
- ssh into your home dir (with terminal or putty, not vscode)
- cd into the
~/wwwdir and make a new~/www/week32dir, thencdinto it. - clone the repo (using the clone URL you copied in step 3)
- you should now have a
week-32-virtuosodir cdinto that newweek-32-virtuosodir, and create and switch to a NEW BRANCH- close out terminal or putty
- open vscode and use the instructions at the end of the VSCode Homework to
connect back to the HTC computer remote host. When you get connected, click
the “Open Folder” button, and point it to
~/www/week32/week-32-virtuoso— that’s the repo you just cloned - visit this page in your browser, and study it for a bit. Change the size of your browser from large to small to see how media-queries are used to change the layout for different screen sizes. You’re going to (mostly) recreate this webpage. You may not inspect the HTML or CSS of the real site.
- To make it a little easier, there are two things you do NOT need to
replicate:
- the green “Wadsworth, Ohio” text in the header
- the mobile menu you can skip. You will just make the main black links dissappear at small screen sizes, and don’t worry about creating the alternate menu
- A General Hint: you’ll be using Flexbox to do all the layout of the site, but you’ll also need to use a bunch of padding and some margin to get the SPACING of elements to look right. So think to yourself “Flexbox for LAYOUT, padding (and margin) for SPACING”.
- to prevent you from getting ahead of yourself, YOU MUST complete the task in these steps.
- Step 1. Treat the top brown bar, the main white section, and the black
footer as if they were the only thing on the page, and think of it as a simple
flexbox puzzle. Get three divs styled with some random bright background
colors and no content, just work on the flexbox layout. (hint: you’ll
probably need to put
min-height: 100vh;on thebodyelement in order to get the middle section to grow properly). - When you’ve completed Step 1 and you have 3 sections (brown, white, and black) about the right size, type a command in vscode to toggle and focus the integrated terminal. You’ll see that you’re dropped into a shell on the HTC virtual machine in the same directory where you’re working. Down in the terminal, commit your work. Then, type a shortcut to hide the bottom panel so you can get back to work.
- Step 2. Next, treat the inside of the brown header as it’s own mini flexbox puzzle. Here’s a hint: start by making two divs inside the header, make them each take up half of the width of the whole header. Pop the logo into the first div, and then put the four black links in the second div. The Four black links themselves will be flex items of their parent. When you’ve got it, commit your work in the same method as described above.
- Step 3. Next, work on the main, largest section in the middle. It has two
columns (the text-ish area, and the form). Treat these two columns as their
own mini flexbox puzzle - create two divs, temporarily set their background
color to some weird bright color, and get them looking about right. Put some
simple text in the contact-form div that says “Form will go here” and ignore
it for now. Then, Work on replicating the left column. You’ll need to bring in
the
patio.jpgimage I put in the repo. (Hint: at the bottom of the left column I used SIX different<ul>elements to make the 6 list chunks). When you’re done, commit your work. - Step 4. Create the form in the left hand column. Make it
POSTto this URL:http://server.howtocomputer.link/week24/echo. Commit your work. - Step 5. Add media queries so that at small screens, your page adapts in the same way as the real page does. Note: ignore the mobile menu, just hide it at small screens. Commit your work when you’re done.
- Step 6. Work a little bit on spacing, colors, fonts — trying to get it to
mostly match the appearance of the real site. Don’t worry about 100%
perfection, just get it mostly there, then commit your work. Here are some
colors to help:
- brown:
rgb(208, 209, 198) - green:
rgb(172, 206, 146) - dark green:
rgb(124, 157, 99)
- brown:
- When you’re done, you’re going to submit a MR to your own fork — which is a
little different. Last week with the “cars” repo, you submited a MR to the
repo owned by the
htcgroup which is the default behavior in GitLab. Just follow these steps: - push the branch you created in step 10:
git push origin <branch-name> - in the terminal, click the URL to create a new MR
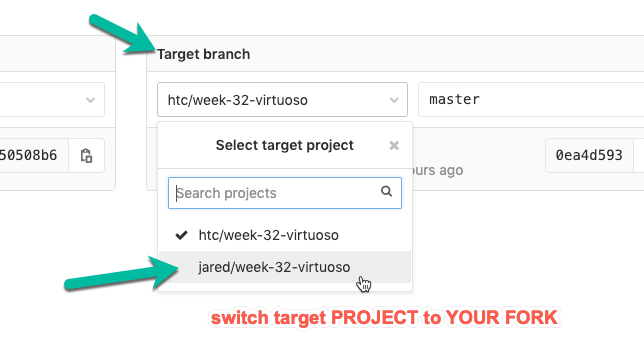
- on the MR screen click the
Change brancheslink:

- after clicking change branches, change the TARGET PROJECT to your own fork:
- Then submit the PR, and Slack me the MR url.
- I will leave you some feedback on your MR, and have you improve some of your code. 😊