Week 31 Homework 💻 🐢
New stuff we learned this week: 🤔
SSH Keys, etc. 🔐
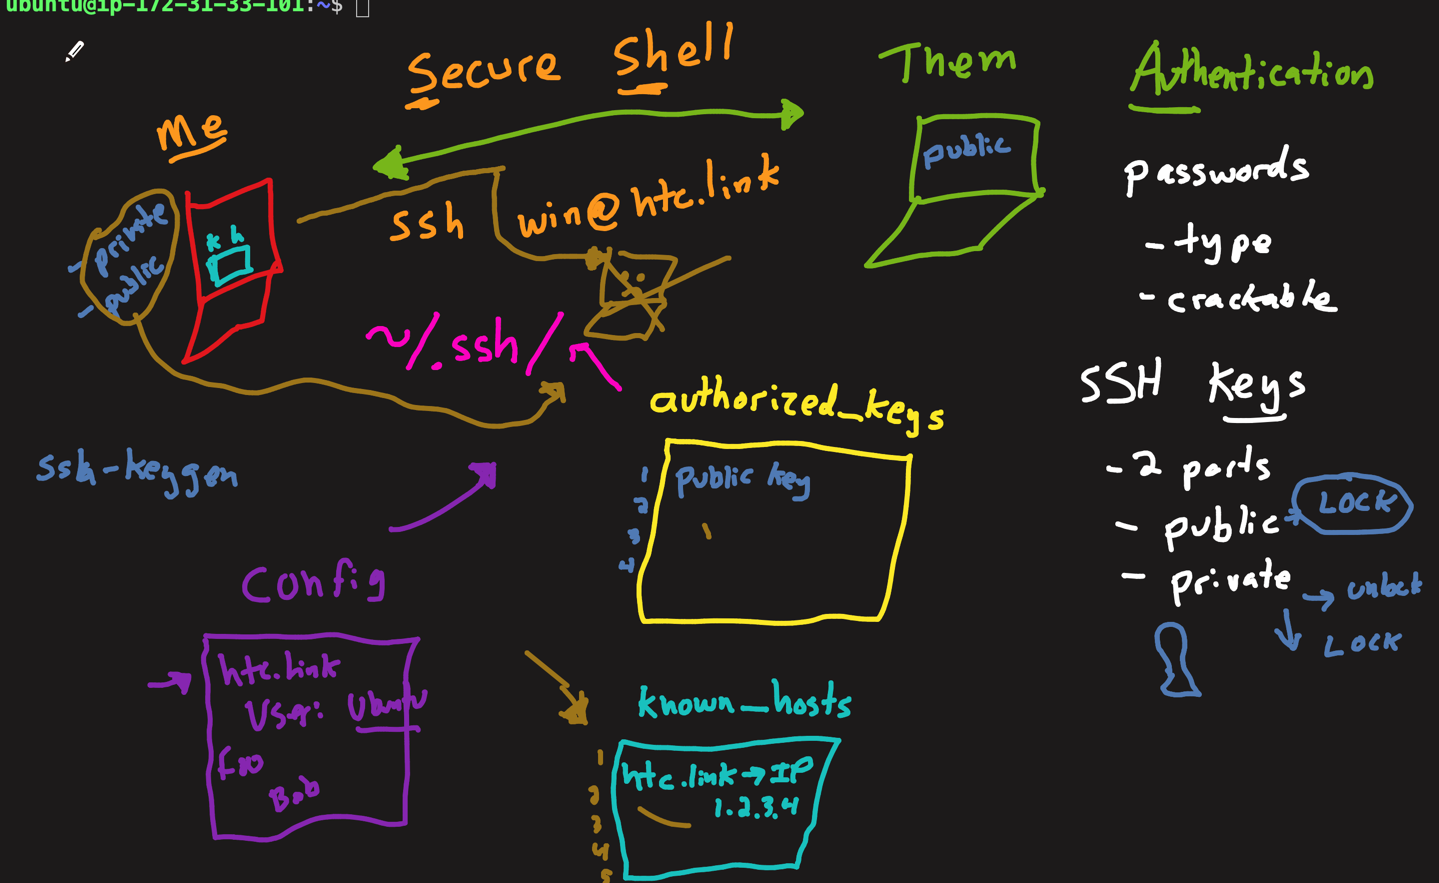
sshcan be made secure with passwords — but these are very easy to crack, so it is far more common to do SSH securely with cryptographic keys.- ssh keys come in pairs — a private key and a public key. The public key can only be used to ENCRYPT something, so it’s safe to share. The private key can decrypt so it must be kept secret! Here’s what my main public key looks like:
ssh-rsa AAAAB3NzaC1yc2EAAAADAQABAABCAQDJ5HZK17ev5FuytPlwxEHvSCMVPnV6cMzAEqhdaZ6JzMRcONy99naxXIDHhPPIhF6CfrgUCFa5lICFbVxpTg5JPBHsCprqUB/WZzd3aOXAhiUu6YJ9fCFciLtkVpmGpFDyjSIm42klUIQ/zSTSUaOqzbZI8ABeQ4YX5Drfh2xVjU3e5CGPiRJBiRQ40t7ocsSt6MYmezB5lTXw8CGCxGnZpZskD05vwV6Q4ZcHVD0iHOH8XqA8PPVQo/dqov/Wt1DlNVEiJjgbRrGrZqz44rFP0CYTBzxwg2u/9q7tLcGxrtxEo8yDTzCCO9Wxa2bPpxARQcEhBugfFp45tDHUiI7gsIoHy8DZDfzbvCd9rsoLfGmuyau2CgnY/vWJe6F+qWI3jzM5t5aOtCe7punWeTe95C0hl9Ja3mGd9MilW+WB5lPQcl+r0scpOg3iS4zVO9j+Z76NHa0DFf1ujr0VsPGzpz5oiTU/bmRaSfrMO0jSmA3DqrvpjaQ5vrCFfcAuh+Wd72oHCjkew3wfyUj32YzlcNcG/8UVLF6n7yLC/h3EHCTVgZff2iNWRzWf1lFRhjD3B+Nx7wPM/FvZe4bC9j1qDJspXM73GHlfk9lVowXc5h0iqa6xfcPfqi+FCsnWo8+HGTEc9wpenT3RdmzR4a2ts1Ld4YL+vLu/aczHP8zUqQ== jared@netrivet.com- On unix-y computers (linux, mac), the standard place where ssh keys and other
ssh goodies go is in a hidden folder at the path:
~/.ssh. If you don’t have this folder, you can make it:mkdir ~/.ssh - The most common name and location for a default ssh key is
id_rsain your~/.ssh/directory. It has two parts:~/.ssh/id_rsa.pub(which is the public key), and~/.ssh/id_rsawhich is the private key. - generating an SSH key is done rarely enough that it’s not really useful to memorize the commands (I always google it).
- the
~/.ssh/authorized_keysfile is a simple, plain-text file with one public key per line. This is where a unix-y computer keeps a list of keys for trusted computers that are allowed tosshin. - This means, that to get key-based ssh access to a computer somewhere,
you need to put your public key into that computer’s
~/.ssh/authorized_keysfile. - The first time you connect to a remote computer with
ssh(using password, or key), your computer will always put up a scary warning saying Hey! We don’t know for sure what this other computer is you’re connecting to, are you sure you trust it?. The warning looks like this:
The authenticity of host 'radwebsite.com (35.231.145.151)' can't be established.
ECDSA key fingerprint is SHA256:HbW3g8zUjNSksFbqTiUWPWg2Bq1x8xdGUrliXFzSnUw.
Are you sure you want to continue connecting (yes/no)?- theoretically, you’re supposed to verify the
fingerprintto make sure some hacker isn’t intercepting your request, but in reality almost noone every does this. If you typeyes, you’ll see this message:
Warning: Permanently added 'radwebsite.com' (ECDSA) to the list of known hosts.- that message means that now your computer has a record of the digital
fingerprint and IP address for the url
radwebsite.com. It keeps this record in a special file at the path~/.ssh/known_hosts. - from that point on, every time you connect to
radwebsite.comyour computer will check that the IP address matches. If it doesn’t, you get this scary message:
@@@@@@@@@@@@@@@@@@@@@@@@@@@@@@@@@@@@@@@@@@@@@@@@@@@@@@@@@@@
@    WARNING: REMOTE HOST IDENTIFICATION HAS CHANGED!     @
@@@@@@@@@@@@@@@@@@@@@@@@@@@@@@@@@@@@@@@@@@@@@@@@@@@@@@@@@@@
IT IS POSSIBLE THAT SOMEONE IS DOING SOMETHING NASTY!
Someone could be eavesdropping on you right now (man-in-the-middle attack)!
It is also possible that a host key has just been changed.
The fingerprint for the RSA key sent by the remote host is
51:82:00:1c:7e:6f:ac:ac:de:f1:53:08:1c:7d:55:68.
Please contact your system administrator.
Add correct host key in ~/.ssh/known_hosts to get rid of this message.
Offending RSA key in ~/.ssh/known_hosts:12
Host key verification failed.- if you’re certain you’re not being hacked, (like maybe you own the server and
you changed it’s IP address), then you just delete the line of
known_hoststhat the warning points you to. (see the second to last line of the example above). - one more interesting file that you can make in your
~/.sshdir is a plain text file calledconfig. This is like a place to storesshconfiguration settings for different hosts. For example, if you always typessh tabitha@howtocomputer.link, you could tell yourconfigfile that you always want to use the usertabithawhen connecting tohowtocomputer.link. You do that like this (in~/.ssh/config):
Host howtocomputer.link
  User tabitha
IdentityFile ~/.ssh/id_rsa- if you have this in your
~/.ssh/configfile, then you can just typessh howtocomputer.linkand you’re golden! (I think it also unlocks tab-completion for the host as well 👍). - if you get confused on any of this, simply refer to this diagram:
Github / Gitlab
- GitHub is a website/company that facilitates easier collaboration on
software projects using
git. - GitLab is the same thing, a competitor/alternative to GitHub.
- inside of GitLab, you can clone a repository owned by someone else by pressing the fork button at the top of the repository. The purpose of a fork is usually to be able to push branches to your own copy of a repo, and then possibly open a Pull/Merge request to the original repo.
- a Merge Request (or Pull Request) is a request to have a branch
merged into another repo. Github/Gitlab create a nice web page for PRs that
allows you to see a web-based
git diffand to make comments and have a discussion about the proposed changes. The web page has a button (for the repo owner) that allows them to merge the changes with a click. - Github/Gitlab gives you ssh clone URLs so that you can clone repos down to your own computers and work on them there, and then push/pull changes via ssh.
- in order to do git clone/pull/push/fetch using
sshyou have to paste your computers public key into the web interface. Behind the scenes, GitLab puts your public key into it’sknown_hostsfile.
Useful Links:
Flashcard Assignment
- add 4 new
unixflashcards:~/.sshdirectoryknown_hostsfileauthorized_keysfile~/.ssh/configfile
Homework Plan:
- 1 day adding to and reviewing flashcards
- 2 days SSH Homework
- 1 day GitLab Homework
- 1 day Web Homework
- 2 days touch typing practice
- 2 days watch CCCS #28
Homework day 1
Homework day 2
Homework day 3
Homework day 4
SSH Homework #1
- carefully review the “New stuff” above
- do your flashcard assignment first
sshinto your home dir- check if you have a
.sshfolder (you’ll have to use a flag to see hidden folders, because the folder begins with a.) - create the
~/.sshfolder if it doesn’t exist, then move down into it - ok, next we’re going to create a brand new SSH key pair, NOTE: change the email address in the command below
- type this command, substituting your own email address:
$ ssh-keygen -t rsa -b 4096 -C "your_email@example.com"- accept the default filename of
~/.ssh/id_rsa - lease passphrase empty by just hitting enter twice
- now do a
lsand you should seeid_rsaandid_rsa.pub - cat out both of your key files so you can see the contents
- type a command that will allow you to see the permissions of both of your new ssh key files
- if they are not already correct, change them to:
id_rsa.pubshould be set to-rw-r--r--id_rsashould be set to-rw-------
- congrats, you’ve made an ssh key, now we just need to get the public key onto another server so we can use it.
- cat out the public key and copy it
- next, one time we’re going to
sshinto the practice machine I made using a password. To do that, typessh <your-name>@ssh-practice.howtocomputer.link. The password is the one I showed you in class yesterday. - once you’re connected to the practice computer, make a
~/.sshfolder and inside it, create anauthorized_keysfile that contains one line — the ssh public key you copied in step 15. - exit out of the practice computer, which will bring you back to the HTC computer.
- now, you should be able to connect to the practice computer without being
prompted for a password. Try it by typing
ssh <yourname>@ssh-practice.howtocomputer.link. If you get in without typing the password, it worked! If not, try to review the previous steps carefully checking if you did each on correct. - log out of the practice computer, back to the HTC computer.
- next, create a file with something in it that will make it so that you don’t
have to supply the
<yourname>@part of the ssh command. Review the “new stuff” if you’re not sure what to do. You’ll know you did it correctly if you can ssh directly to the practice computer by typing onlyssh ssh-practice.howtocomputer.link.
SSH Homework #2
- complete SSH homework #1 first
- on your own computer, cd into your home dir, and create an
.sshdir if it doesn’t exist. cdinto the~/.sshdir, and do alsto make sure there’s not already aid_rsakey pair. If there is (which I doubt), Slack me and I’ll tell you what to do.- use the same command from part 1 of the ssh homework to generate a ssh key pair, and then make sure that the permissions are correct.
lsandcatto see that you have made a new pair, and look inside both of them for fun.- BEFORE you try to use the key, we’re going to do 2 or 3 extra steps to make sure this works.
- first, in your shell, type this command exactly (you don’t need to understand
what it does):
eval "$(ssh-agent -s)" - the second step is only for Mac computers, skip if you’re not on a Mac. If
you are on a Mac, create a
~/.ssh/configfile and put these lines in it:
Host *
  AddKeysToAgent yes
  UseKeychain yes
  IdentityFile ~/.ssh/id_rsa
— third, if you’re on a Mac computer, type ssh-add -K ~/.ssh/id_rsa. If
you’re on Linux type: ssh-add ~/.ssh/id_rsa
- after all that, copy your new public key to a
~/.ssh/authorized_keysfile on the HTC computer. - log out of the HTC computer and test if you can make a connection without entering your password.
- assuming you got that working, modify the ssh config file on your own computer so that you also don’t need to type your name.
- if you did all the steps right (and my instructions are good 🤞) then you
should now be able to ssh into the HTC computer by only typing
ssh howtocomputer.link.
GitLab Homework
- do the SSH homework (both parts) first
- visit gitlab.howtocomputer.link and click the “Register” tab. Fill out the form to create a new account, making sure to remember your password.
- once you’re logged in, send me a Slack so I can add you to the How to Computer group.
- spend a few minutes (but not too long, OK?) clicking around and exploring all the places you can go. See how many of them you can understand.
- find the place where you can set your profile picture, and upload a picture
- try to find the group I made called
How to Computer. Once you find it, click into one or two of the repositories. Try to get a little familiar with how GitLab gives you a webpage view of a git repository. - find the place in GitLab where you can paste a ssh public key. Once you find
it, log into the HTC computer, then cat out and copy the public key you made
in SSH Homework #1. Paste it into the GitLab web UI and give it the name
howtocomputer.link machineso you don’t get confused later if you add another key. - try to find the main repository webpage for the homework site repo. It’s one of the repos in the HTC group. You’ll know you’re on the right page if you see a BLUE clone button in the upper right, but don’t click it! If after poking around for a little while, you can’t find it, click here to go straight there.
- on that page, look at the URL in the browser’s address bar, you’ll see it ends
with
/htc/homework-site. The pattern is this:/<owner>/<repo>. So in this case,htcis the owner (that’s the group I made) andhomework-siteis the slug of the repo itself. Does that make sense? - next, find the fork button in the upper right of the page and click it. Choose to fork it into your own name (that will be the only option).
- once forking is complete, you should be taken to the webpage for your own copy of the repo. Look at the URL in the browser address bar again. Do you see how it changed? Does it make sense what the two parts of the URL are?
- now, here on your forked copy of the repo, click the blue clone button and
then copy the
sshurl. - next,
sshinto your home dir. You’re now going to clone the homework site right into your home dir. To do that, typegit clone <the-url-you-copied>. If the clone is successful, that means you got your ssh key set up correctly. Hooray! - now cd into the
homework-sitedir that git created for you when you cloned. - type a command to see if you have any git remotes. Do you understand why you have one, and why it is called what it is?
- type a command to see more information about the git remotes — you should be
able to see that your
originremote is coming from gitlab. Cool, huh? - make a new branch name (called whatever you want) and switch to it.
- open the file that contains the page you’re reading right now, it is (from the
repo root dir) in the path
src/markdown-pages/week-31.md— open it with vim. - don’t worry if you don’t understand all of what you see (it’s written in a
format called
markdownwhich I haven’t taught you yet, but it’s similar to how you can type special things in Slack) - Find part of this homework page that you think could be improved or made more clear. If you noticed a mistake, or something like that, use vim’s search feature to find that chunk in the code. Once you found something to change, make the change and commit your work.
- next you’re going to push your branch up to your own fork on GitLab (try
telling that to your mom and see what she says, haha). To do this, you’ll use
the
git pushcommand, in the format:git push <remote> <branch>. - if you did it right, you should see a URL show up in the terminal output offering you to create a Merge Request. You can either copy that URL, or try holding down command or control and clicking right on it. Most terminals will allow you to click a URL if you hold down command or control. But if clicking doesn’t work, just copy the URL and paste it into a new tab of your web browser.
- on the Merge Request screen, edit the title and description to give me a nice explanation of why I should merge your changes, then click to submit the PR.
- slack me with the URL of your Merge request so I can look it over!
Web Homework
- NOTE: make sure you have done the GitLab homework first. Go to the HTC group
on GitLab, and find the repo called
week-31-cars - make your own fork of the repo
- clone the repo down into a
~/www/week31dir that you create after ssh-ing in to the HTC computer. - once it’s cloned, cd into the repo, and make and switch to a new branch.
- edit the
app.jsfile: - turn the big string I gave you into a nice usable array (hint: the name of the variable should give you clue) — this can be done in one line of javascript
- map over the array you have, creating a
lidom node for each, containing the name of each car (this is very similar to last weeks homework) - use
Array.forEachto insert each list item into the Dom, into theulelement I gave you. - commit your work
- You should see a list of a handful of car names
- next, edit your code so that each list item also displays the horsepower, and adds a sad emoji if the car is out of stock
- commit your work.
- change you code now to remove the “out of stock” emoji. Instead, use
Array.filterto only show cars that are in stock. - commit your work.
- if you didn’t already use them, refactor your code to use an arrow function
for the predicate passed to
Array.filter() - commit your work.
- submit me a Merge Request, and then slack me the Merge Request URL.
- When I get the MR, I’m going to review your code and make a few suggestions for improvements. You’ll need to address my feedback, make a new commit, and push back up your branch.
- after you address my feedback, I’m going to give you each one or two more mini-features that I want you to implement, but I’ll communicate this through the MR. You’ll need to implement the mini-feature/s I request, and then push up another commit.
- I’ll have one more quick step for you to do after that, that I’ll tell you about when you get there.